TWID #32: Building a Synth with Cmajor
Going from setup to sound with Cmajor and audio programming.

This week I was learning a new audio framework called Cmajor. It seems to be very powerful but has almost no documentation for absolute beginners available, so I’ll try to share what I have learned so far.
What is Cmajor
Cmajor is a programming language for writing fast, portable audio software. It is a language designed for writing DSP Code. That code can be used in many different ways like Stand-alone Apps, VST/AU/AAX Plugins and in the web to name a few.
Why Cmajor
I stumbled across it while researching resources to learn JUCE (another audio platform) and it seemed to be a nice approach and they promised it would be easy, so I thought it would be interesting to see how much I could learn as a beginner.
Installing Cmajor
The first thing you need to do is install their VS Code extension and then install the latest release for a convenient workflow. This video shows you where to put all the files in there.
Creating the first patch
In VS Code you can press cmd + shift + p and then type “create a new patch“ to get a fresh one. To keep it simple don’t use the gui for now. This will create two files:
patchName.cmajor
patchName.cmajorpatch
If you hit cmd+shift+p and type “run patch“ it will open a view and you see some interface where you can control the patch.
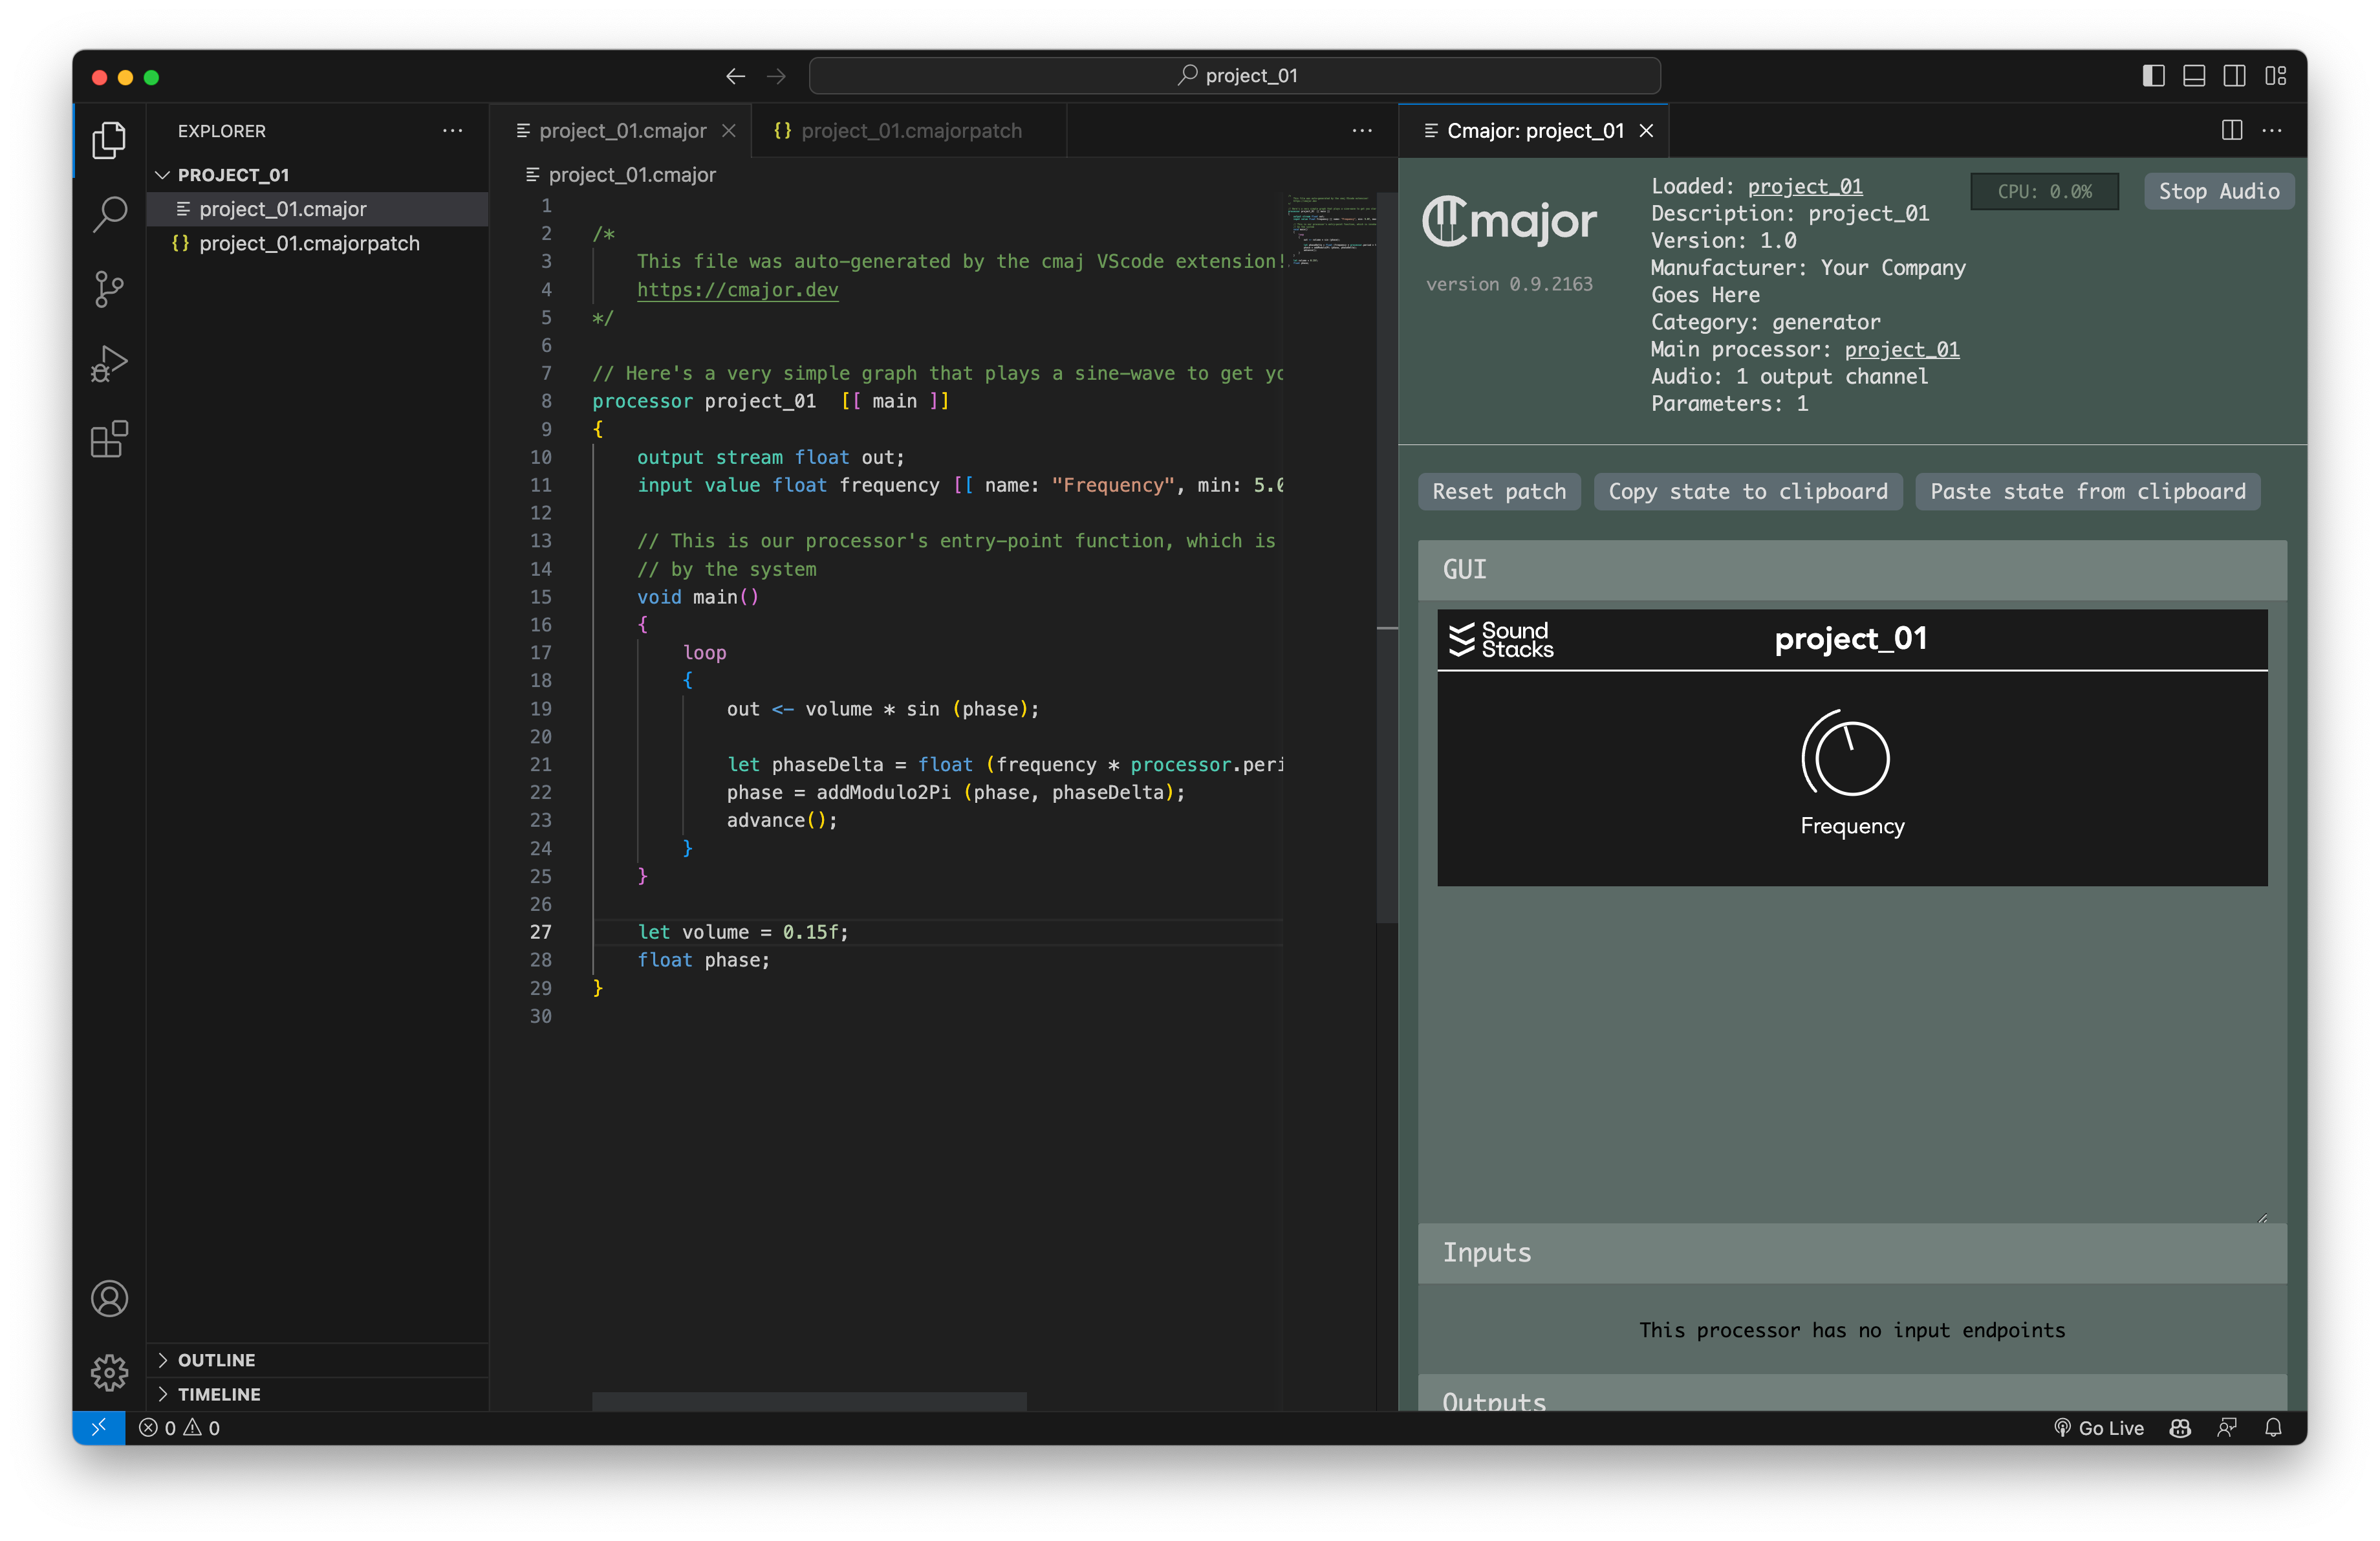
Adjust the patch
I found this example a bit confusing, so let’s create our own. Change the whole code in patchName.cmajor to this. When you run the code, it will generate a sine wave at 440 hz that will run continuously.
graph project_01 [[main]]
{
    output stream float out;

    node sineWave = std::oscillators::Sine(float32, 440);

    connection sineWave.out -> out;
}
What you have done now ist four things:
Create a main graph that is the entry point of our app.
Define an output to send audio out
Add a node that is called sineWave and uses a sine oscillator from the standard library set to 440 hz
Create a connection between the sineWave out and the out to hear the sound
Adding inputs
One thing that we had in the first patch, was the ability to control the frequency of our oscillator. This can be done by adding an input to the patch and connecting it the the sineWave node.
graph project_01 [[main]]
{
    output stream float out;
    input event float32 frequencyParam [[name: "Frequency", min: 0, max: 2000, init: 440]];

    node sineWave = std::oscillators::Sine(float32, 440);

    connection {
        frequencyParam -> sineWave.frequencyIn;
        sineWave.out -> out;
    }
}
Now you have done three things:
Add an input event called frequencyParam that has a name and some values
Rewrite connection to fit multiple into one thing
Connect the freqencyParam event to the Oscillator frequency
Adding midi input
The next thing we want to have is a way to play this thing. For that we use the midi input from the library. Then connect it to an envelope that will use its gain out to change the volume of our oscillator.
graph project_01 [[main]]
{
    output stream float out;

    input event float32 frequencyParam [[name: "Frequency", min: 0, max: 2000, init: 440]];
    input event std::midi::Message midiIn;

    node {
        sineWave = std::oscillators::Sine(float32, 440);
        envelope = std::envelopes::FixedASR (0.01f, 0.1f);
    }

    connection {
        frequencyParam -> sineWave.frequencyIn;
        midiIn -> std::midi::MPEConverter -> envelope.eventIn;
        (sineWave.out * envelope.gainOut) -> out;
    }
}
Now you have done five things:
Add midi input called midiIn from the standard library
Rewrite the node to fit more inside
Add a new node called envelope that uses a FixedASR envelope from the standard library
Connect the midiIn to an MPEConverter that produces and Note On and Note Off event which is used to trigger the envelope it is connected to.
Multiply the Oscillator with the envelope Gain to change the volume when a midi note is received
When you run the code you have a small keyboard you can use to try things.
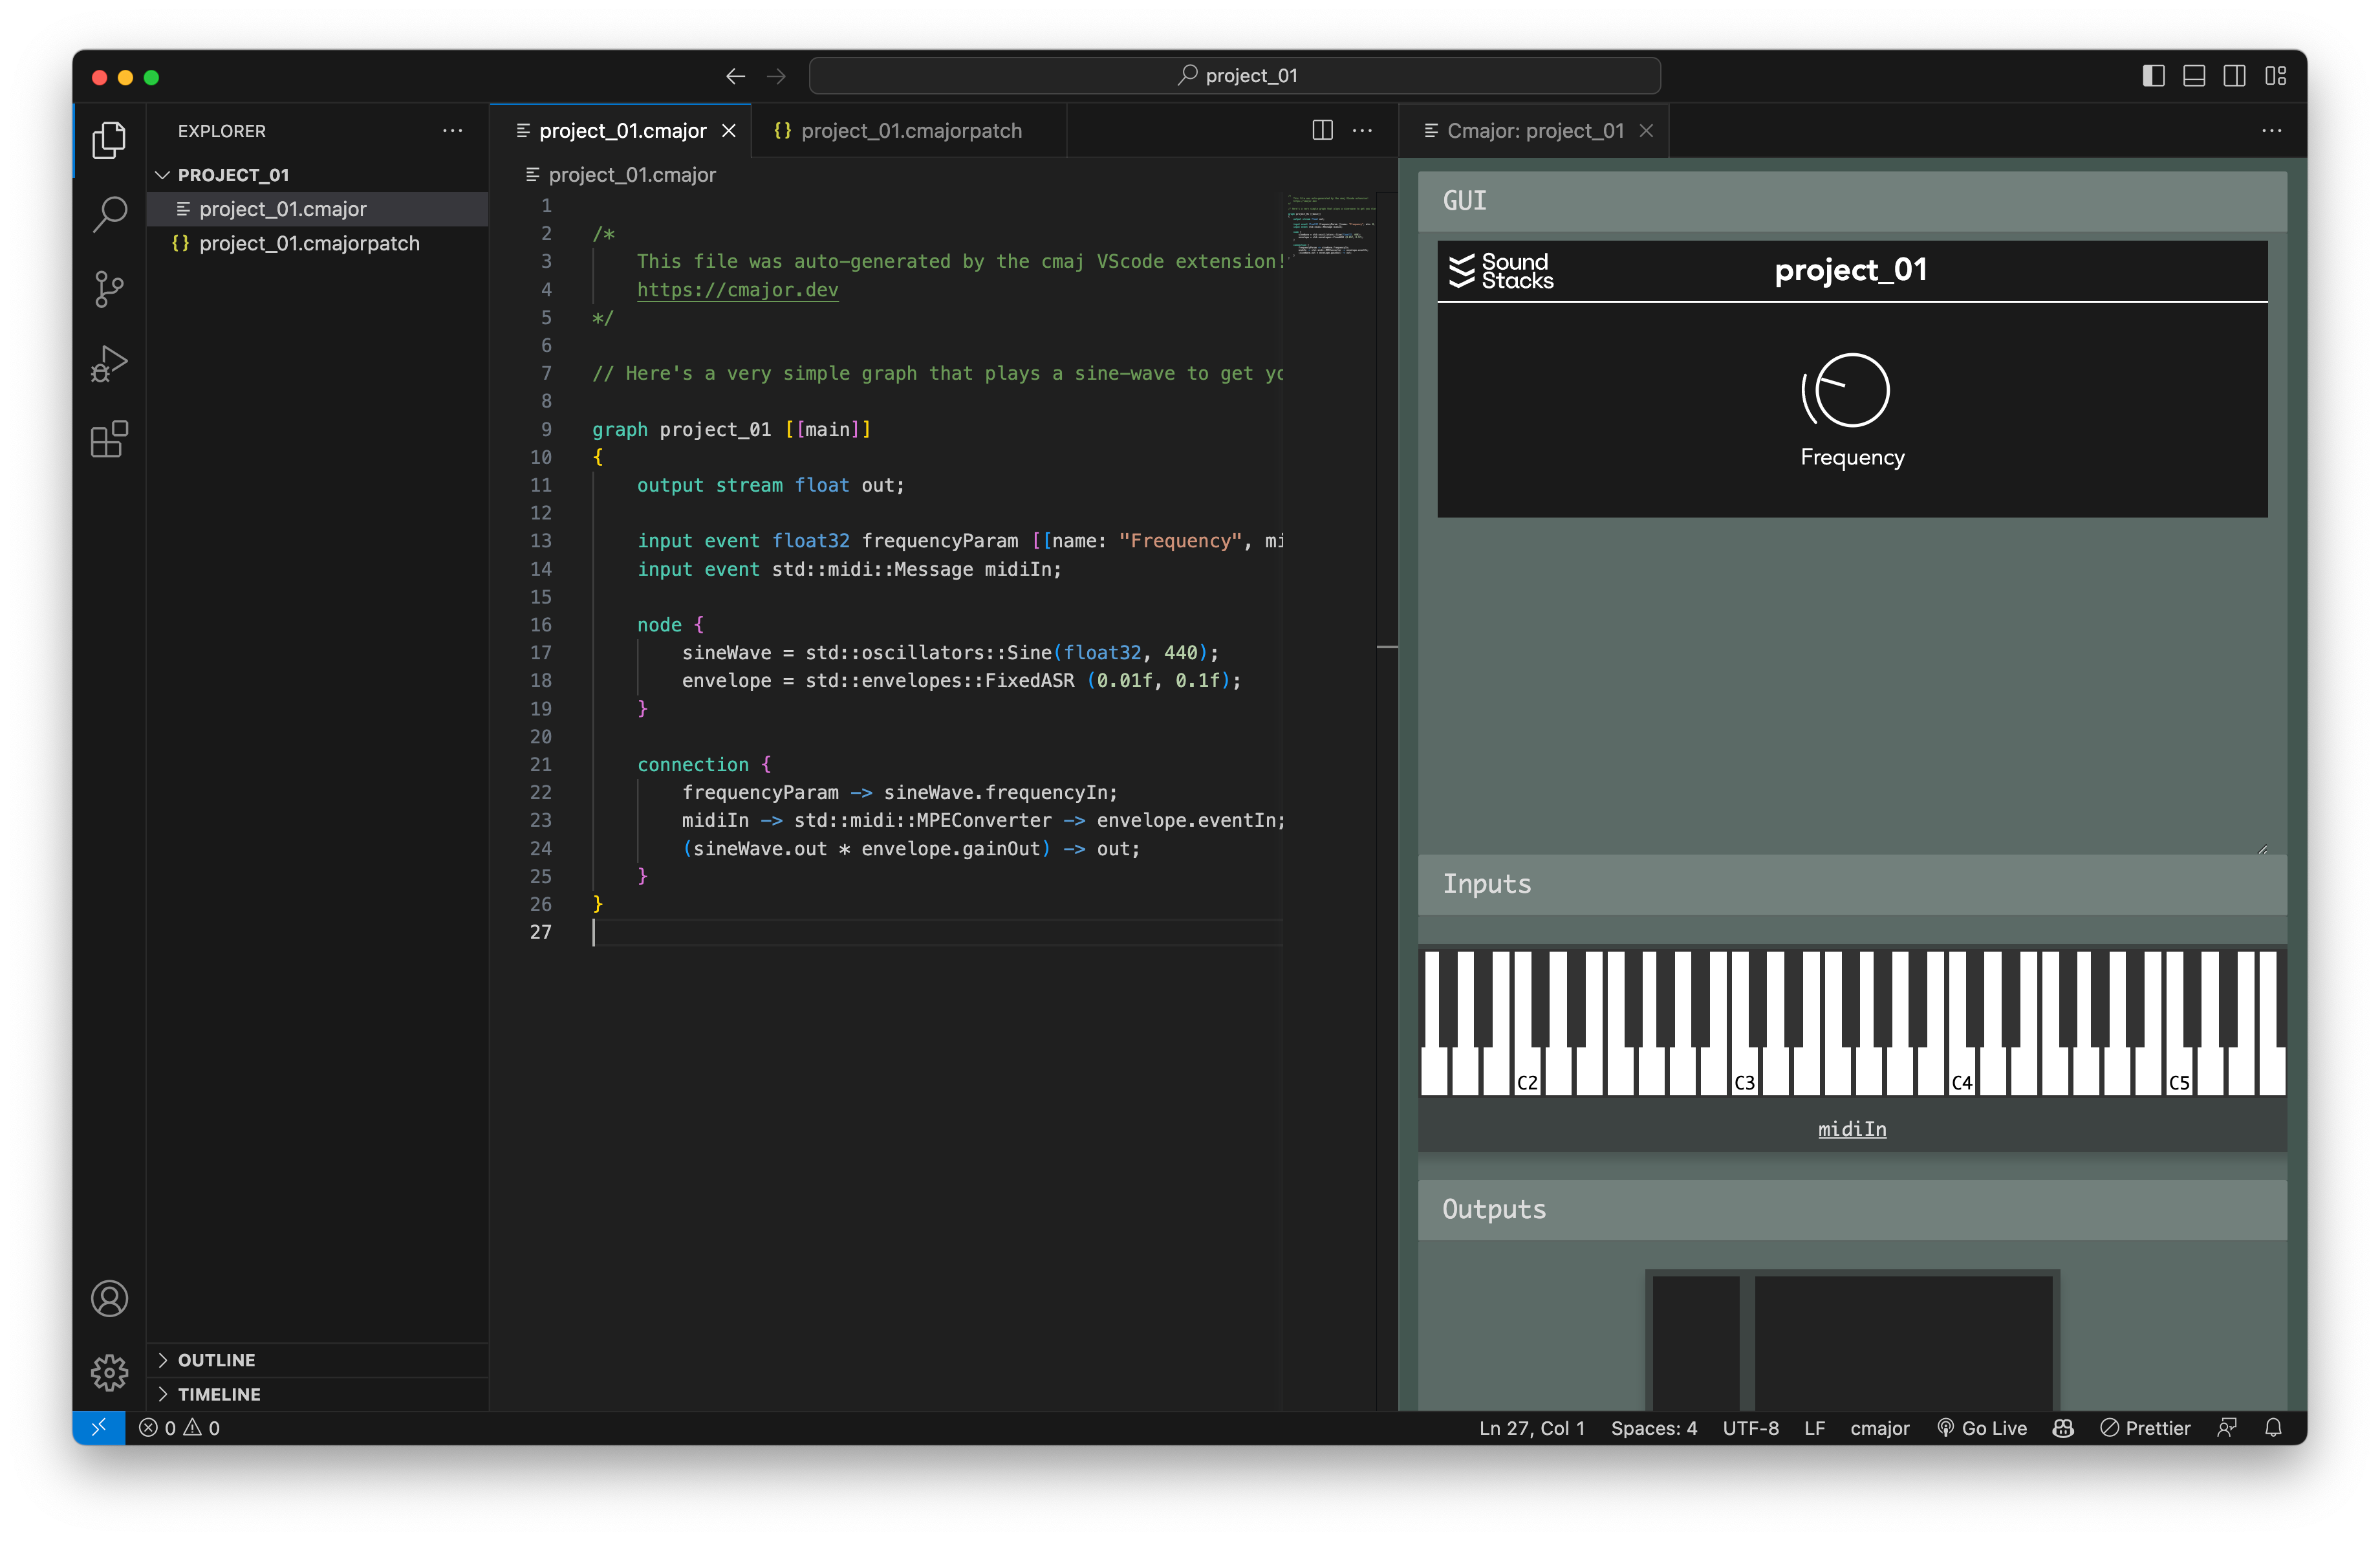
When you hit the keys you will hear a sound, and you can use the frequency knob to change it. But this is not quite what we want. We also need to change the frequency when the not is played.
For that we need to create a new thing called processor that takes a midi note as an input and gives is back a frequency we can use for the pitch of the oscillator.
graph project_01 [[main]]
{
    output stream float out;

    input event std::midi::Message midiIn;

    node {
        noteToFrequency = NoteToFrequency;
        sineWave = std::oscillators::Sine(float32, 440);
        envelope = std::envelopes::FixedASR (0.01f, 0.1f);
    }

    connection {
        midiIn -> std::midi::MPEConverter -> envelope.eventIn;
        midiIn -> std::midi::MPEConverter -> noteToFrequency -> sineWave.frequencyIn;
        (sineWave.out * envelope.gainOut) -> out;
    }
}

processor NoteToFrequency
{
    input event std::notes::NoteOn eventIn;
    output event float32 frequencyOut;

    event eventIn (std::notes::NoteOn e)
    {
        frequencyOut <- std::notes::noteToFrequency (e.pitch);
    }
}
Now we have changed quite a lot but lets see what we have done:
Remove frequency input, since we don’t need it anymore
Add new node called noteToFrequency based on the custom process we have defined below our graph
Adding a new connection to take the midiIn trough a MPEConverter to get the Note On event which is used by the noteToFrequency node to extract the note number and convert it to hz and use it to control the frequency of our oscillator
Create our own process called NoteToFrequency that has a Note On event as an input and an output the gives the frequency which is created by the event that uses the noteToFrequency converter from the standard library
I don’t know if it’s possible to use that conversion directly in our connections, but I was not able to do it, so this is why we use this rather complicated way of doing that.
Adding a filter
Now that we can play notes with midi that have an envelope we need to add a filter for more control over the sound. To hear the filter we also need to change the waveform to something that has enough harmonics that we can filter out. Let’s use a phasor for this.
graph project_01 [[main]]
{
    output stream float out;

    input event float32 filterCutoffParam [[name: "Filter Cutoff", min: 0, max: 2000, init: 2000]];
    input event float32 filterResonanceParam [[name: "Filter Resonance", min: 0.1, max: 10, init: 1, step: 0.01]];

    input event std::midi::Message midiIn;

    node {
        noteToFrequency = NoteToFrequency;
        osc1 = std::oscillators::Phasor(float32, 440);
        envelope = std::envelopes::FixedASR (0.01f, 0.1f);
        filter = std::filters::tpt::svf::Processor;
    }

    connection {
        filterCutoffParam -> filter.frequency;
        filterResonanceParam -> filter.q;

        midiIn -> std::midi::MPEConverter -> envelope.eventIn;
        midiIn -> std::midi::MPEConverter -> noteToFrequency -> osc1.frequencyIn;

        osc1.out -> filter.in;
        (filter.out * envelope.gainOut) -> out;
    }
}

processor NoteToFrequency
{
    input event std::notes::NoteOn eventIn;
    output event float32 frequencyOut;

    event eventIn (std::notes::NoteOn e)
    {
        frequencyOut <- std::notes::noteToFrequency (e.pitch);
    }
}
Again, this code is getting even more complex, but lets see what has changed here:
Added two new inputs for filter Cutoff and Resonance
Rename our sineWave to osc1 and use a phasor instead
Add a new node called filter that uses a svf from the standard library
Connect the input named filterCutoffParam to the filter.frequency for the cutoff and the input named filterResonanceParam to the filter.q for the resonance
Rename sineWave.frequencyIn to osc1.frequenyIn
Connect the osc1.out to the filter.in
Replace the sineWave.out with filter.out
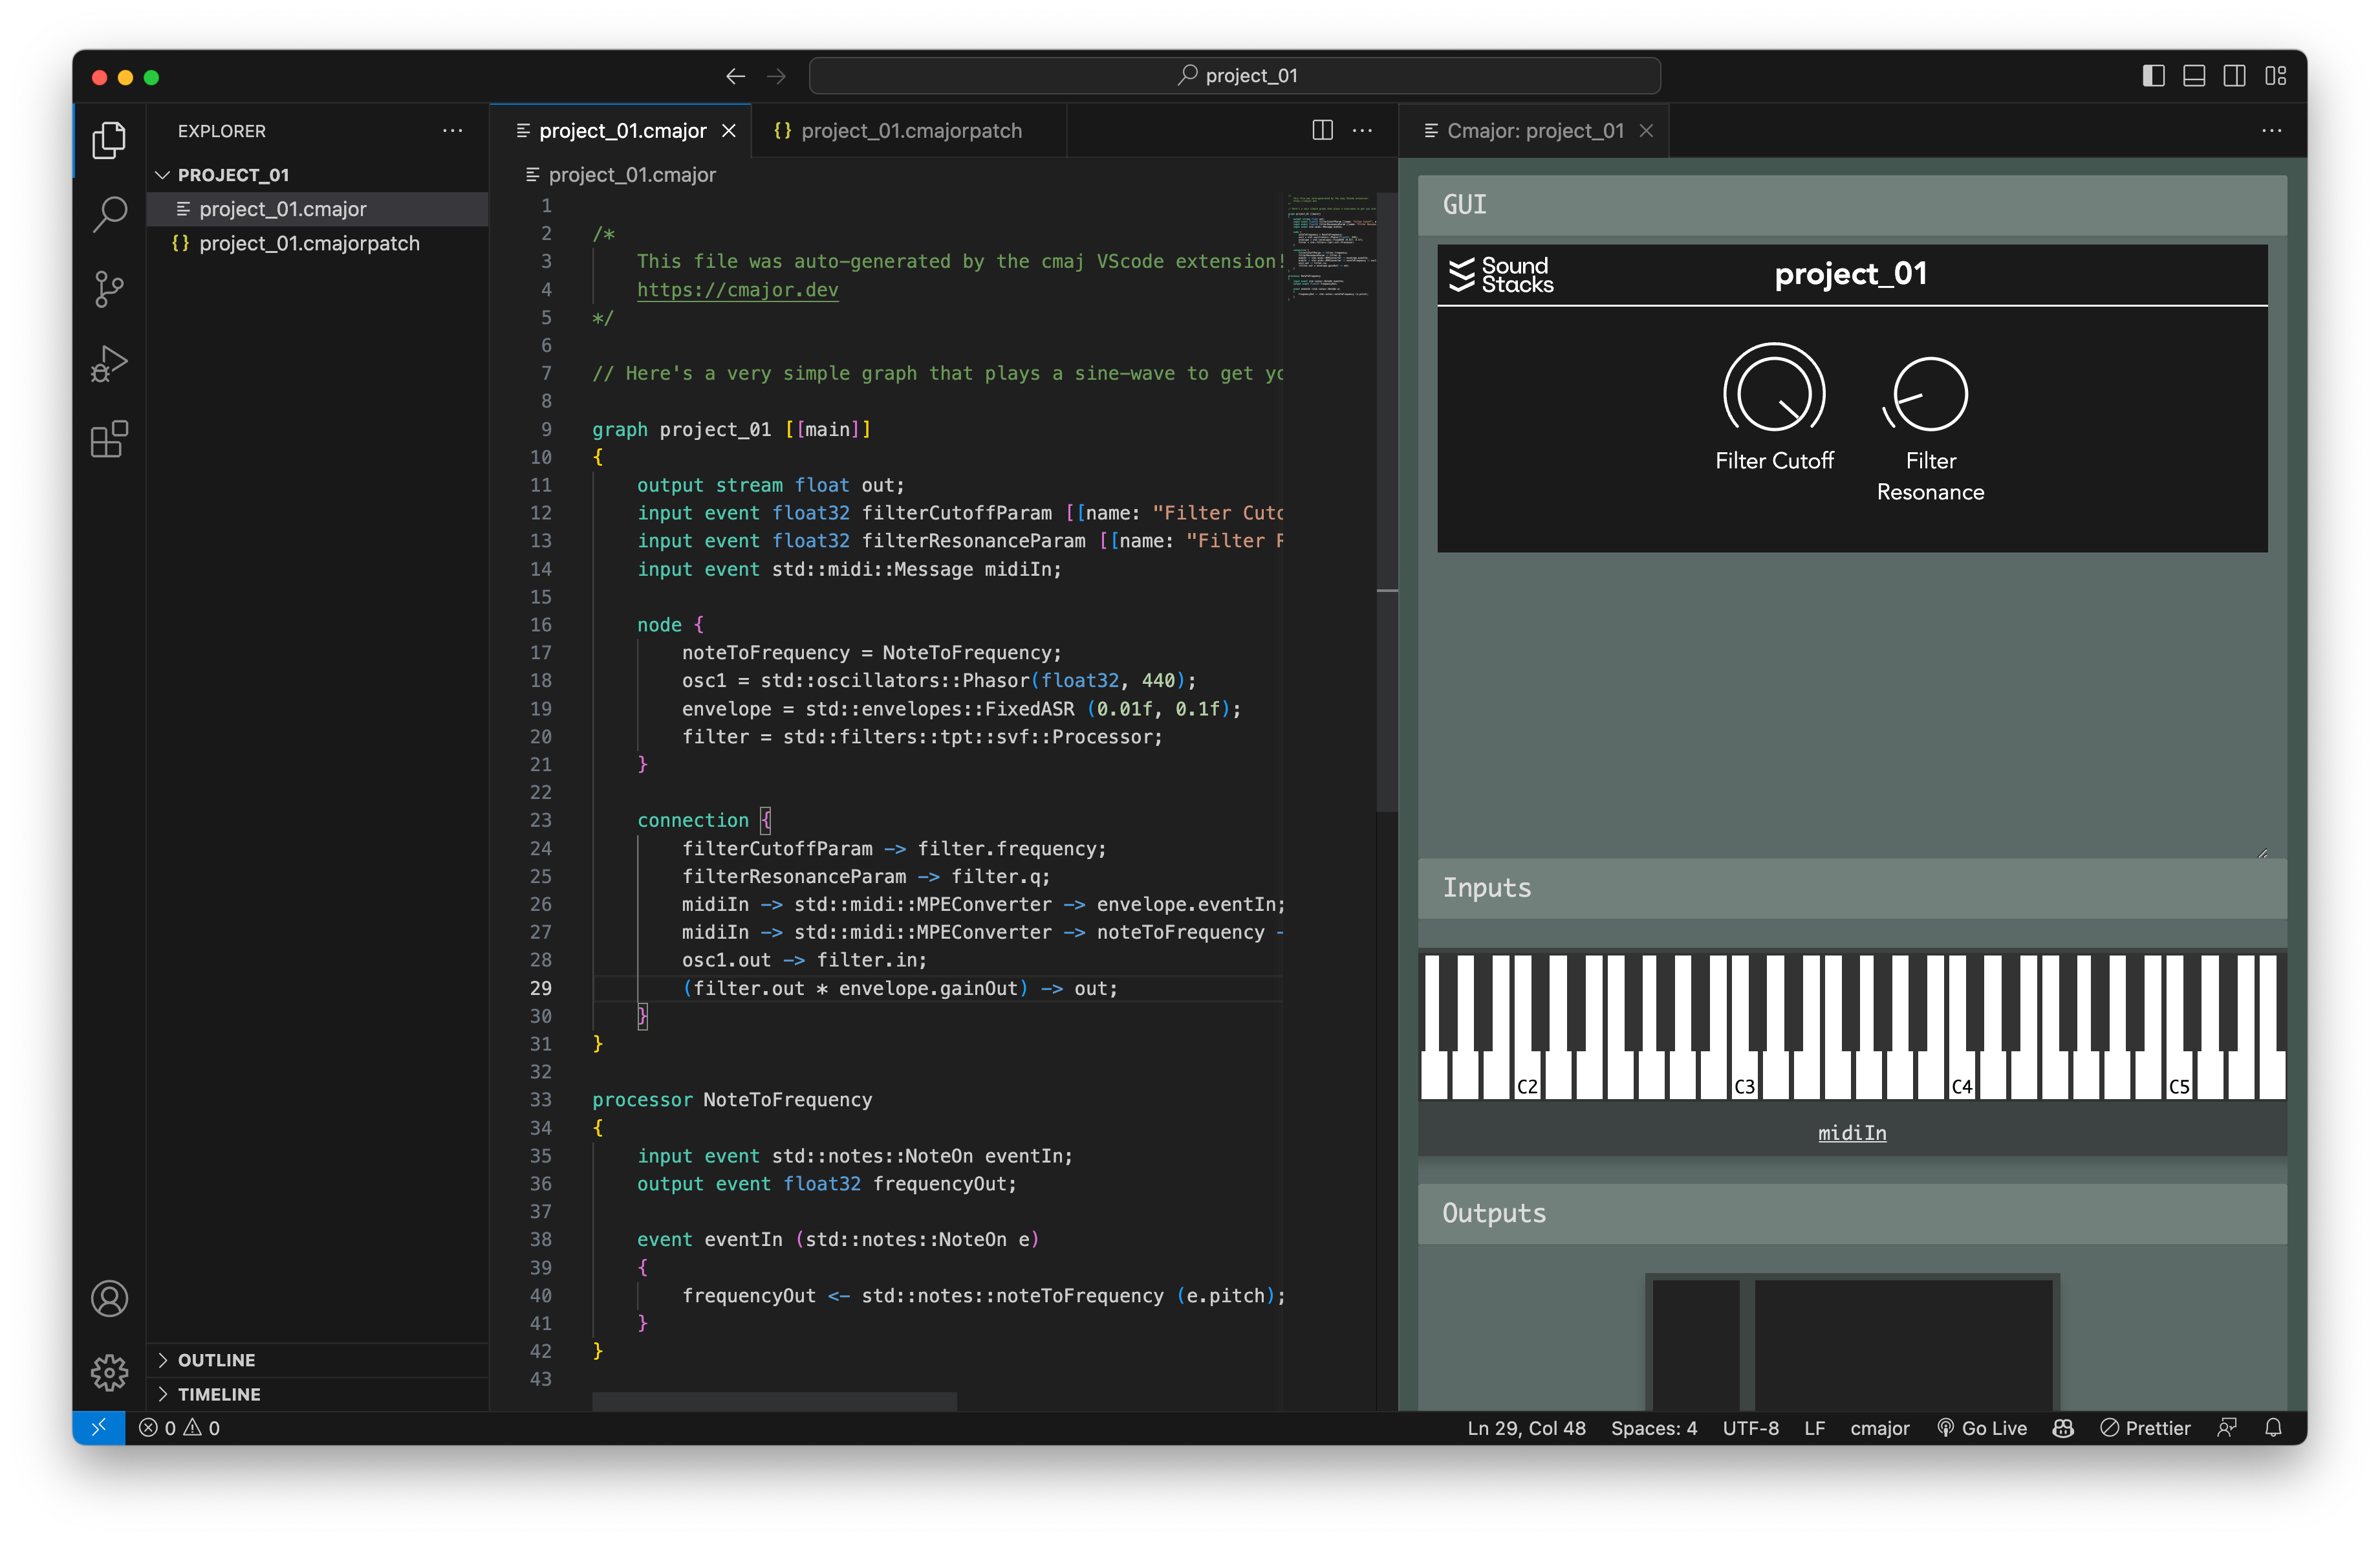
This gives us a simple instrument that we can play and use in different situations.
You can use one of the app or plugin templates and drop the projectName.cmajorpatch on it to see how that works.
Add a custom interface with javascript
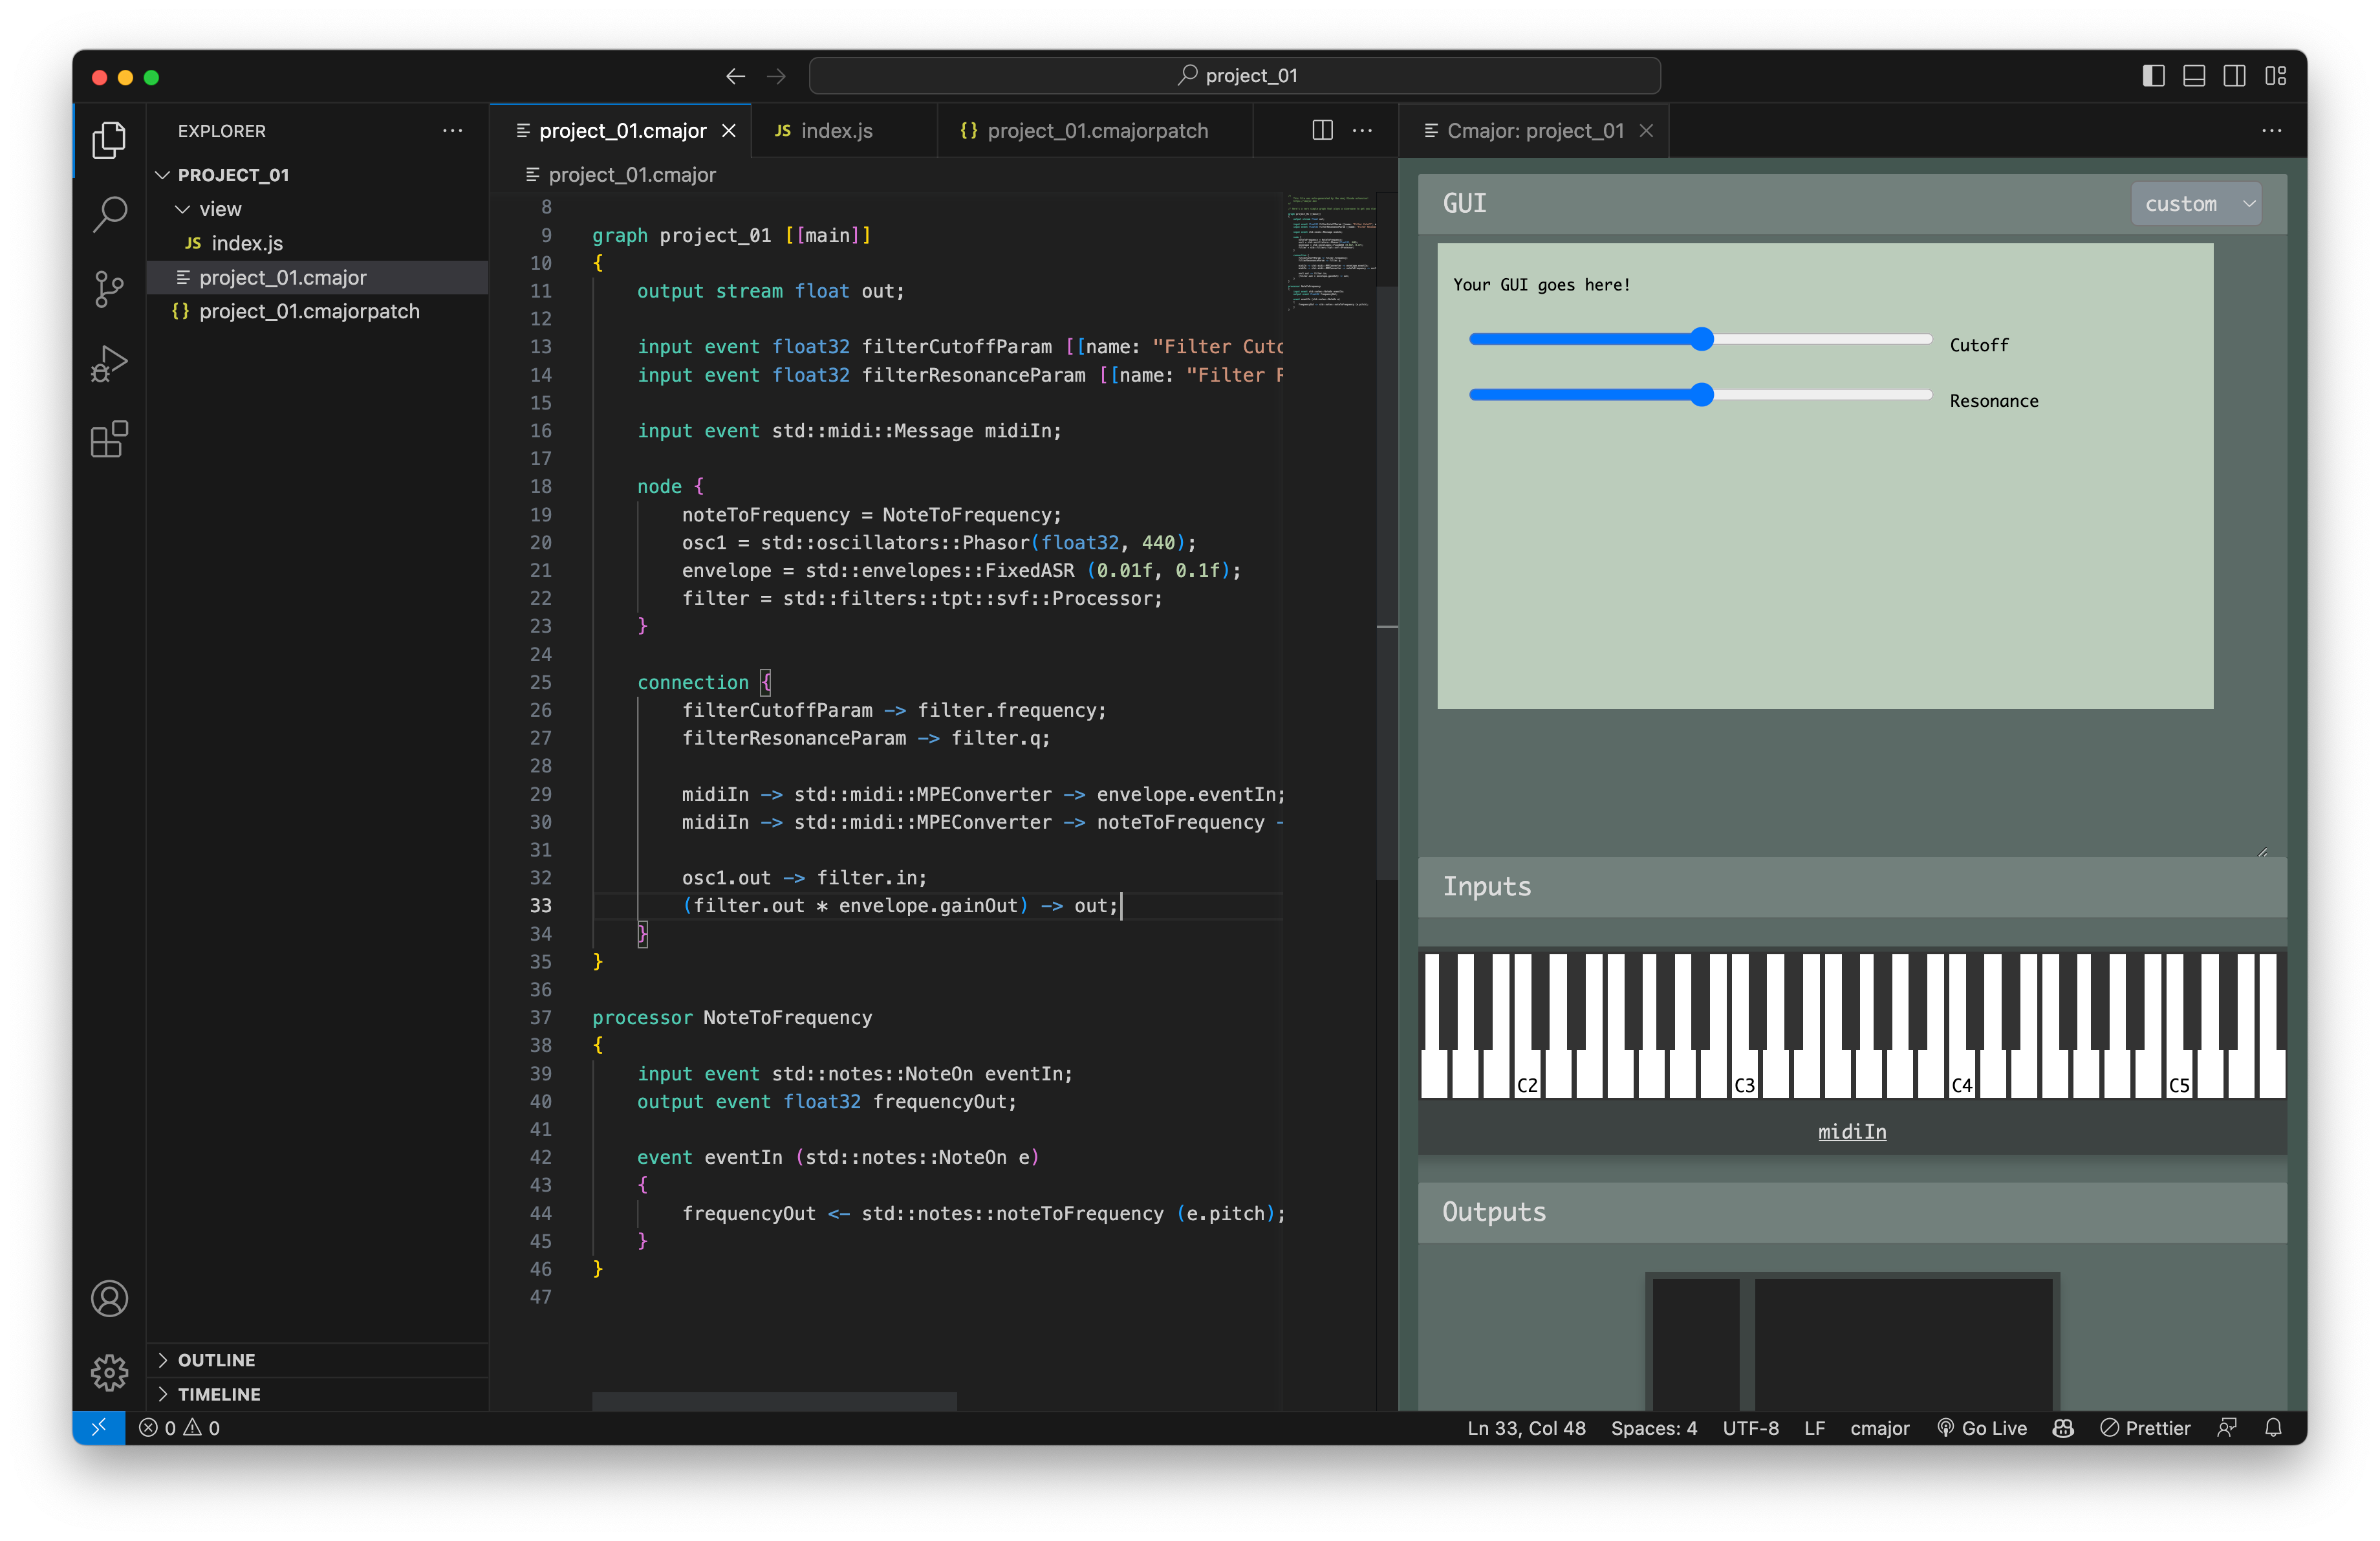
One of the really nice things about cmajor is, that you can use web technology to build your interfaces for it. To do that create a new patch but now use the one with to Gui for that. This will create the same two files as before, but also a folder called view with an index.js file in it. We can use this file to create an interface and connect it to the patch with html, css and javascript.
Replace all of the content of index.js with this.
class project_01_View extends HTMLElement
{
    constructor (patchConnection)
    {
        super();
        this.patchConnection = patchConnection;
        this.classList = "main-view-element";
        this.innerHTML = this.getHTML();
    }

    connectedCallback()
    {
        const cutoffSlider = this.querySelector ("#filterCutoffParam");
        cutoffSlider.oninput = () => this.patchConnection.sendEventOrValue (cutoffSlider.id, cutoffSlider.value);

        const resonanceSlider = this.querySelector ("#filterResonanceParam");
        resonanceSlider.oninput = () => this.patchConnection.sendEventOrValue (resonanceSlider.id, resonanceSlider.value);
    }

    getHTML()
    {
        return `
        <style>
            .main-view-element {
                background: #bcb;
                display: block;
                width: 100%;
                height: 100%;
                padding: 10px;
                overflow: auto;
            }

            .param {
                display: inline-block;
                margin: 10px;
                width: 300px;
            }
        </style>

        <div id="controls">
          <p>Your GUI goes here!</p>
          <input type="range" class="param" id="filterCutoffParam" min="0" max="2000"">Cutoff</input>
          <input type="range" class="param" id="filterResonanceParam" min="0.1" max="10" step="0.01">Resonance</input>
        </div>`;
    }
}

window.customElements.define ("project_01-view", project_01_View);

export default function createPatchView (patchConnection)
{
    return new project_01_View (patchConnection);
}
This seems to be a lot of code but, the two essential parts to connect something to the patch are:
Create an html input element with an id that is the same as the input name in your patch that is a type of range
Use the this.patchConnection.sendEventOrValue (id, value) function to send values to the patch
This will give you a custom interface to control what you have done.
This is it, now you can build a simple synthesiser that has it’s own interface using javascript that you can use as an app or a vst plugin by exporting it and following the steps to build that.
Conclusion
It has been quite challenging for me to get into this language which might be because I am not a professional when it comes to audio development and are lacing some fundamental concepts that are needed for that. But I would have found it easier if there were some more guides that explain things step by step and show the concepts that are needed to build things. Especially what is possible with the standard library could be shown in more detail here.
But I know this is a very new language, so maybe there will be more of this in the future and I have to say that I am really excited about this, because it seems to be a very powerful tool to build all kind of things.
Other things I did this week
Animations
Drawing
That’s it for this week. Hope you liked it.